PLEASE SCROLL DOWN FOR THE ENGLISH TUTORIAL !
Beim Einkauf des 1mm-Hutdrahtes hatte ich mir leider keine Verbindungshülsen mitbestellt.
Bei der ersten Lady habe ich den Hutdraht nur mit Hilfe von transparentem Klebeband fixiert.
Beim Aufräumen meines Bürobedarfs fielen mir Unmengen von gesammelten, nicht-funktionierenden Kugelschreibern in die Hände.
Teilweise uralte Kullis von Firmen, die gar nicht mehr existieren …
Mein Mann sammelt die Dinger wie andere Briefmarken 😉
Das Innenleben eines Kugelschreibers ist interessant.
Jedenfalls die kleine Feder .. denn die kann man als Häkelhutmacher gut als Verbindungshülse nutzen.
Es gibt viele unterschiedliche Größen und Farben habe ich festgestellt.
Da muss man selbst prüfen, welche Feder am besten für den Draht ist.
Aber welche Länge benötige ich für die Lady Linnet?
Man kauft ja den Draht in Meterware.
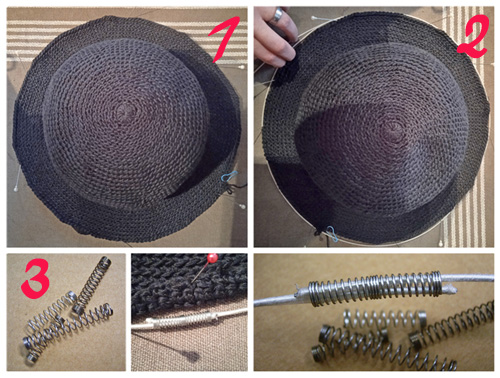
📌Mein Tipp:
☛ 1) Den Hut auf eine Steckplatte z.B. Styropor so legen, dass die Krempe flach aufliegt.
Der Hut selbst steht nach mehrmaligen Aufsetzen fast von allein… die Krempe am Rand nun mit ein paar langen Stecknadeln fixieren.
☛ 2) Den Hutdraht rund um die Stecknadeln legen; etwas überlappen, abschneiden …
☛ 3) und in der Kulli-Feder verbinden.
Ich habe aber trotzdem noch etwas Klebeband benutzt und auch später beim Einhäkeln in die Lady diesen Feder-Übergang
noch von unterhalb der Krempe mit festem schwarzen Nähgarn fest fixiert,
das sich dort nichts lösen kann.
Wer noch andere Tipps für einen 1mm-Hutdraht hat oder immens von den Verbindungshülsen beeindruckt ist,
darf mir gerne seine Erfahrungen mitteilen: info (at) cadooh.de
👒♥♥♥♥♥♥♥♥♥♥♥♥♥♥♥♥♥♥♥♥♥♥♥♥♥♥♥♥♥♥♥♥♥♥♥♥♥♥♥♥ 👒 ♥♥♥♥♥♥♥♥♥♥♥♥♥♥♥♥♥♥♥♥♥♥♥♥♥♥♥♥♥♥♥♥♥♥♥♥♥♥♥♥♥♥♥♥♥♥♥♥♥♥♥ 👒
When purchasing the 1mm hat wire, I unfortunately had not ordered any connecting sleeves.
With the first lady have fixed the hat wire only with the help of transparent tape.
While cleaning up my office supplies, tons of collected, non-functioning ballpoint pens fell into my hands.
Some of them were old pens from companies that no longer exist …
My husband collects them like other stamps 😉
The inner life of a ballpoint is interesting.
Anyway, the small spring … because you can use it as a milliner as a connecting sleeve.
There are many different sizes and colors I have found.
There you have to check yourself which spring is best for the wire.
But what length do I need for the Lady Linnet?
Wire is available by the meter
📌My tip:
☛ 1) Place the hat on a pegboard, e.g. Styrofoam, so that the brim lies flat.
The hat itself stands almost by itself after several times…
now fix the brim at the edge with a few long pins.
☛ 2) Lay the hat wire around the pins; overlap a bit, cut off …
☛ 3) and connect in the ballpoint-spring.
But I still used some tape and also later when crocheting into the lady
this spring transition from below the brim still firmly fixed with strong black sewing thread,
that nothing can come loose there.
Who has other tips for a 1mm hat wire or is immensely impressed by the connecting sleeves,
please feel free to tell me your experiences: info (at) cadooh.de